Showing posts with label Gluten Free. Show all posts

Wednesday, September 9, 2026

Eggplant and Tomato Curry

I must admit I had fun with this one. I had a couple of heirloom yellow eggplants, and I was craving curry. Hmm, yellow curry. What would happen if I made a yellow curry with all yellow vegetables? Okay, delicious. Does it taste different than a curry made with the more the more tradition purple eggplant, red tomato and green or red pepper? Probably not. But, this is a feast for the eyes as well as the palate!

Ingredients: 

1/2 cup brown rice

1 Tbs olive oil 
1/2 cup onion, diced
1 clove garlic, minced
1 tsp minced ginger
1/4 cup water
up to 1/4 cup yellow curry paste
up to 1 can low fat coconut milk
1 Tbs turbinado sugar
2 tsp low sodium soy sauce
1/2 tsp cumin
1 eggplant, sliced then diced into 1/2-inch pieces
1/2 cup Yukon gold potatoes, diced into 1/2-inch pieces
1/2 cup yellow pepper, diced into 1/2-inch pieces
1 can garbanzo beans (optional)
10 yellow pear tomatoes, halved
1/4 cup chopped Thai basil or spinach
1/4 cup chopped chives

Directions: 

Cover the brown rice with 1 cup water and bring to a boil. Cover and cook until done, about 30 minutes. Heat the olive oil in a large nonstick skillet or small heavy bottomed pan. Add the onion, garlic, and ginger and cook until the onion begins to turn translucent, about 5 minutes. Add the water to deglaze the pan. Add 1 or 2 tablespoons of the curry paste and an equal amount of the coconut milk to the pan and whisk to combine. Taste, adding more curry paste if you like it spicier. Add another 8 ounces of coconut milk to the pan along with the sugar, soy sauce, and cumin, stirring to combine. Add the eggplant, potatoes, pepper, and optional garbanzo beans, then cook until the potatoes are done, about 15 minutes. Add the tomatoes, along with the Thai basil or spinach. 

To serve, mound about 1/2 cup cooked rice in a bowl, top with 1/2 of the eggplant and tomato curry. Garnish with the chopped chives.
Stealthy Cooking Tip: Yellow curry paste is the least spicy of the curry pastes. It's made with mostly turmeric, plus cumin, coriander and you guessed it, some chilies. Even though it's mild, it still has some heat. Adding the curry paste 1 tablespoon at a time allows you to control just how spicy you like your curry. As for the other Thai curry pastes, green curry paste is made with green chilies, plus lemongrass and Thai basil, so it's slightly spicier. Red curry is made with red chilies, plus garlic and additional spices and is typically the spiciest of the Thai curry pastes. You can always add some chilies if you want it spicier!

Wednesday, August 12, 2026

BBQ Shrimp Salad with Pear and Arugula

I love salads in summer. Cool and refreshing, they just hit the spot. This one has it all - the BBQ flavor we crave all summer long, crunchy pear and cucumber offset by smooth avocado and juicy tomatoes. Plus, everything gets tied together with a summery citrus vinaigrette. 

Ingredients: 

12 shrimp, large size
1 Tbs butter
1 Tbs bar-b-que sauce
2 cups salad greens or arugula
1 pear, seeded and sliced
1 avocado, sliced
10 cherry tomatoes
1/2 cucumber, peeled and diced
1/4 cup citrus dressing

for the dressing:
3 Tbs cup orange juice
2 Tbs citrus ginger honey
1 Tbs Dijon mustard
1/4 cup extra virgin olive oil

Directions: 

Heat a skillet with the butter over medium heat, adding the shrimp. Cook for about 2 minutes per side, until they turn pink. Add the BBQ sauce to the skillet and toss to coat. Divide the salad greens between 2 plates. Add 1/2 the pear, avocado, tomatoes, and cucumber to each plate. Top each with 1 - 2 Tbs citrus dressing and toss. Arrange the BBQ shrimp across the top of each salad. 

Serves 2
Stealthy Cooking Tip: I find this salad to be substantial enough for me. But - it's certainly not enough for everyone! Serve a basket of breadsticks along with this salad and you'll find it's definitely enough for either a hearty lunch or dinner. 

Thursday, May 28, 2026

Rotisserie Chicken Chili

I've been wanting to make a white chili for a while, and some leftover rotisserie chicken provided the perfect "excuse" - and many of the additions are there because of what was in my frig at the time! I'm very happy with the result, tasty and just as full of chicken as I wanted. As always, at least with cooking as opposed to baking, feel free to change things up a bit to fit what's in your frig today. 

Ingredients: 

1 Tbs olive oil
1/2 onion, chopped
1 clove garlic, minced
1/2 cup yellow pepper, chopped
1 can Ortega type chopped mild chili peppers
1 can butter beans, drained and rinsed
1/2 tsp cumin
1 tsp chili powder, use more or less to taste
1/2 tsp paprika
3 cups water or chicken broth
1 Tbs chicken stock mix, if not using chicken broth
1 Tbs yellow miso
1 can cannellini beans, drained and rinsed
1 cup corn
1 rotisserie chicken breast, chopped
salt and pepper to taste
1 avocado, chopped
1/2 cup Mexican cheese shreds, or dairy free alternative
1/4 cup cilantro

Directions: 

Heat the olive oil in a heavy bottomed pot or cast-iron soup pot. Add the onion, garlic, and peppers and cook until the onions begin to turn translucent and the peppers soften. Add the chili peppers, butter beans, and spices. Taste your chili powder. Some have quite a bit of heat, while others are very mild. Use a potato masher to mash the butter beans. Add the liquids, chicken stock or water and miso. Add the cannellini beans, corn, and chicken. Heat until everything is hot. Taste, adding salt and pepper to taste, along with more chili powder if it isn't spicy enough for you. Serve in bowls, topping with avocado, cheese and cilantro. 

Serves 4 

Stealthy Cooking Tip: Mashing the butter beans midway through the cooking process will thicken the chili. White chili is usually thickened with a combination of salty chips and sour cream. The mashed beans healthy it up just a little bit!


Thursday, May 7, 2026

Turkey Orzo Soup

Here's an easy to make, and easy to eat, soup that hits all the right notes. It's filling, tasty, and healthy, too. This has that Italian MOP combo, you know - mushrooms, onions, and peppers, as its base, along with turkey, then adds orzo as the grain. If you don't eat gluten, see the notes below. There are some great gluten free options available. 

Ingredients: 

1 tsp olive oil
8 oz ground turkey
1/2 cup chopped onion
1/2 cup chopped red pepper
1/2 cup chopped mushrooms
1 tsp minced garlic
1 tsp dried oregano
1 tsp dried basil
3 cups low sodium chicken stock
1 can tomatoes, finely chopped
1/2 cup orzo or gluten free orzo
2 cups chopped spinach
salt and pepper to taste
fresh basil or parsley as garnish

Directions: 

Heat the olive oil in a heavy bottomed soup pot. Add the ground turkey and cook for several minutes until no longer pink. Add the onion, pepper, mushrooms, garlic, and spices and cook several more minutes until the onions turn translucent and the mushrooms begin to give off their liquid. Add the chicken stock and tomatoes and bring to a simmer. Add the orzo and cook until the orzo is al dente, about 5 minutes for wheat orzo and up to 14 minutes for gluten free casava orzo. Add the spinach and simmer another minute until the spinach wilts. Taste the soup, adding salt and pepper to taste. Serve, garnishing with fresh herbs. 

Serves 4

Stealthy Cooking Tip: My favorite gluten free orzo is by Jovial and is made from casava flour. It cooks up and tastes much like wheat-based orzo. However, there is one way it doesn't act like orzo containing gluten. Gluten based orzo holds up well overnight, with flavors melding beautifully. However, Jovial orzo tends to break down when it sits overnight. The flavors still meld, resulting in a deeper, more complex flavor, but the orzo breaks apart into small rice like pieces.  This makes the soup much thicker. Just add some water to make your leftovers soup like ... or enjoy it as a tasty stew!


Saturday, January 10, 2026

Buckwheat Crepes with Ham and Asparagus

Crepes or Galettes - the name is interchangeable in my book. Either name defines a thin pancake filled with either savory or sweet goodness. These savory dinner pancakes come with a mind to use up some of the ham slices that fill my freezer after the holidays. That's a good thing; I do love ham. These are easy to make, and don't require the fussiness of making them ahead of time, a 24-hour resting period, or rewarming. I'm happy with how these turned out, and hope you will be happy with yours, too.

Ingredients: 

1/4 cup buckwheat flour
3 heaping Tbs Measure 4 Measure flour or whole wheat pastry flour
1/4 tsp salt
1 egg, beaten
2/3 cup milk alternative, I used unsweetened soy milk, or milk

butter
3-4 fried eggs
1/4 cup grated yellow cheese, I used Daiya dairy free cheese
15-20 stalks asparagus, trimmed
6-8 slices ham

Directions: Mix the flours together with the salt. Add the egg and milk, then beat until frothy. Add more milk if needed to make a thin pancake batter. Heat about one teaspoon of butter in a 10-inch skillet over medium heat. Add about 1/4 cup batter, swirling the batter around the bottom of the skillet to cover the skillet bottom.  Allow to cook for about 2 minutes. The crepe is done when the bottom turns brown, and the top is no longer shiny, about 3 or 4 minutes. I like to add the sprinkle the cheese down the middle of the crepe just before it is done cooking, so the cheese has time to melt. Covering the pan for a minute assures melted cheese! Remove the crepe to a plate, cover to keep warm. Continue cooking until all the crepes are cooked. Prepare the remaining ingredients while the crepes are cooking. Heat another teaspoon of butter in a second skillet over medium heat. Add the asparagus, rolling to make sure the spears cook on all sides. Cook until they turn a bright green, about 3 minutes. Remove the asparagus from the skillet and keep warm. Add the ham to the skillet, cooking until heated through. Finally, cook the eggs, 1 per person. I like mine either over easy or over hard, however, poached is the more traditional way with eggs. 

To assemble, lay one cheesy crepe on each dinner plate.  Top with 2 slices of ham, 5 stalks asparagus, and one egg. Fold the edges of the crepe over and serve. 

Serves 3 or 4 

Stealthy Cooking Tip: If you're using a gluten free flour, do make sure it has xanthan gum as one of the ingredients. Xanthan gum works like gluten, so that flour holds together. Measure 4 Measure and several other brands work fabulously. Serve with a side salad or fruit for a complete meal.


Monday, September 22, 2025

Ramen with Mushrooms, Broccoli, and Baby Bok Choy

It's fall, officially, and that means it's soup time! I love soup year-round, but I especially love it in the fall. I like the warmth and how it's the ultimate comfort food for me. This soup is a ramen bowl with a miso-chicken broth that's filled with my favorite veggies. So much goodness in one bowl! With all the variety, it can easily be a one dish meal. 

Ingredients: 

1 tsp olive oil
1/4 cup vertically sliced onion
1 tsp minced garlic
1 tsp minced ginger
1/2 cup broccoli florets
2 baby Bok choy, sliced diagonally into 1-inch pieces
1 cup sliced mushrooms

1 quart water
2 eggs
2 tsp chicken broth
2 tsp miso
1 piece ramen

1/2 tsp salt or to taste

Directions: 

Heat the olive oil in a nonstick skillet. Add the onion, garlic, and ginger and cook until the onion turns translucent, about 5 minutes. Add the vegetables, along with 1/2 cup water and allow to steam. Turn off the heat. 

Start the eggs while the vegetables are cooking. Add the eggs and water to a medium size pot. Bring the water to a boil, then boil the eggs for about 8 minutes. Remove the eggs to allow them to cool slightly. When they're cool enough to handle, peel them and slice them lengthwise. Add the chicken broth and miso to the water along with the ramen. Cook the ramen for the amount of time recommended on the package. Add the vegetables to the ramen. Taste, then add salt as needed. Serve by ladling into bowls. Top each serving with the sliced hardboiled egg. 

Serves 2

Stealthy Cooking Tip: For a gluten free option, try Lotus brand rice ramen. I find it at Costco, very reasonably priced. And, oops! You may notice that I forgot to put the egg on when I took the photos!

Wednesday, September 3, 2025

Tilapia Tacos with Peach Salsa

It's taco Tuesday, and I'm ready for a new kind of fish taco. I like the subtle nature of tilapia because it takes on flavors easily. This time, I used some chili powder like a blackening mixture. The sweetness of the peach plays beautifully with the heat of the chili. To top it off, it's pretty, too!

Ingredients:

for the salsa:

1 peach, chopped
2 thin slices red onion, finely chopped
1 Anaheim chili, seeded and finely chopped
2 Tbs white balsamic vinegar
1 Tbs chopped cilantro

for the tilapia filling:

1 Tbs olive oil
1/2 tsp minced garlic
1 large piece tilapia
1 Tbs chili powder
several grinds of sea salt

the extras: 

4 corn tortillas
4 slices lemon

2 Tbs mayonnaise
several shakes of sriracha
Directions: 

Make the salsa by combining all of the ingredients in a bowl. Stir and refrigerate until ready to serve. Heat the olive oil in a skillet, adding the garlic and letting it sizzle for about one minute. Dredge the tilapia in the chili powder, then add it to the skillet. Cook until the fish can easily be flaked. Flake the fish. Taste and add salt as needed. Prepare the sriracha mayonnaise while the fish is cooking by mixing the mayonnaise together with the sriracha, add more or less sriracha depending on how hot you like it. Heat a nonstick skillet over medium heat. Add the tortillas and cook for about 30 seconds per side. To serve, spoon some of the fish into the middle of each tortilla. Top with some of the salsa, then some of the sriracha mayo. Serve and enjoy!

Stealthy Cooking Tip: I served this with some blistered shishito peppers and a salad to some friends. We all enjoyed it ... even before the margaritas were served!

Friday, August 8, 2025

Kimchi Fried Rice

There are so many recipes for kimchi fried rice. This Korean staple is a delightful mix of kimchi and rice. It traditionally includes a meat along with an egg on top. I've mixed things up just a bit (what else is new!?) in this recipe, by eliminating the meat, but have remained true to the kimchi and rice. 

Ingredients: 

1 tsp olive oil
1shallot, sliced
1 clove garlic, minced
1 tsp ginger, minced
1 cup sliced mushrooms
1 carrot, peeled and diced
1/2 cup edamame

1 tsp olive oil
1 bag precooked brown rice and quinoa
1/2 cup kimchi, squeezed to remove moisture, and chopped

2 Tbs mayonnaise
1 tsp sriracha

1 tsp butter
2 eggs, cooked, over easy or poached

1 Tbs snipped chives
1 tsp sesame seeds

Directions:

Heat the olive oil in a nonstick skillet. Add the shallot, garlic, and ginger and cook for 1 or 2 minutes, until the shallot begins to crisp. Add the mushrooms, carrot, and edamame and cook for another 5 minutes, until the mushrooms begin to soften and the carrot is crisp tender. Remove the cooked vegetable to a plate and cover to keep warm. Add the second tsp of olive oil to the skillet. Open the bag of rice and let the rice cook, undisturbed, for several minutes until it begins to crisp. Add the kimchi and vegetables to the rice and let everything cook together until heated through. Divide the kimchi rice between two plates. Add the butter to the pan and cook the eggs. Make the sriracha mayo while the eggs are cooking by combining the two ingredients together in a small bowl. Place one egg over each serving of fried rice. Top with a drizzle of sriracha mayo, some of the snipped shives and sesame seeds. Serve. 

Serves 2
Stealthy Cooking Tip: Do remember to squeeze the kimchi! Kimchi is juicy. Adding liquid to fried rice will prevent it from browning and becoming crisp. However, topping the fried rice with a runny egg is another thing. The rice is already crisped, so the runny center of the egg provides a nice contrast to the crunchiness of the rice. Enjoy!


Friday, February 7, 2025

BBQ Shrimp with Spring Veggies

Here's a quick and simple to make shrimp dish that's sure to have your tastebuds tasting springtime. While many of these vegetables are available year-round, they're freshest when picked fresh locally. They're even better when you can pick them from your own backyard garden! I was able to use the first asparagus spears of the year along with some green onions out of the garden. The red and yellow peppers came out of my freezer, and the rest came from the grocery store. However, they taste like spring to me!

Ingredients:

1 cup cooked brown rice

8 oz shrimp
1 tsp butter
1 tsp olive oil
1 Tbs BBQ sauce

1 Tbs olive oil
1/2 cup chopped red and/or yellow pepper
1/2 cup snap peas, cut into 1/2-inch lengths
1/2 cup asparagus spears, cut into 1-inch lengths
1 carrot, peeled and cut into 1/2-inch pieces
1/4 cup chopped red onion
1/2 cup chopped pineapple
1 green onion, cut into 1/2-inch pieces
1 tsp minced ginger
1 clove garlic, minced
1 Tbs tamari soy sauce
1 tsp sesame oil
Sea salt and pepper to taste

black and white sesame seeds
Directions: Cook the rice as directed. For a quick dish, use precooked microwave rice. Heat the butter and olive oil in a nonstick skillet. Cook the shrimp for about 4 minutes, until they are opaque. Add the BBQ sauce and continue cooking for another minute. Remove the shrimp from the skillet and keep warm. Wipe the skillet clean. Add the olive oil, together with the vegetables. Cook until the onion begins to turn translucent, and the asparagus gets bright green. Add the soy sauce and olive oil. Taste, adding salt and pepper to your liking.

Serve by spooning 1/2 cup of brown rice into each of two bowls. Add half of the vegetable mixture to each bowl. Top with 1/2 of the shrimp. Sprinkle each serving with the sesame seeds and serve. 

Serves 2

Stealthy Cooking Tip: I usually like cooking my own brown rice in a rice maker, but sometimes time demands a quicker cook time. I've found that Seeds of Change Brown Basmati Rice tastes good, is low in sodium and cooks in 90 seconds! All is good. 


Monday, March 4, 2024

Dairy Free Mushroom Alfredo Sauce

I'd been looking and looking for a good substitute for the dairy ridden alfredo sauces that don't work well for me. Finally, I found one that works! Of course, I had to change things up just a bit, but the basics remain the same. My heartfelt thanks to thevegan8.com for the inspiration!

Ingredients:

1 cup sweet onion, diced
1 clove garlic, minced
3/4 cup low sodium chicken broth
1/2 tsp salt
1/3 cup raw unsalted cashews
up to 1 additional cup low sodium chicken broth
1 tsp lemon juice
1 Tbs nutritional yeast

1 tsp butter
1 tsp olive oil
1 clove garlic, minced
8 oz cremini mushrooms, sliced
(remainder of the low sodium chicken broth)

fettucine of your choice

Directions: 

Add the onion, garlic, and 3/4 cup chicken broth to a nonstick pan set over medium heat. Cook until the onion is translucent, and the chicken broth has evaporated, about 10 minutes. Transfer the onion mixture to a blender and wipe out the skillet. Add the salt, cashews, about 1/2 cup more of the chicken broth, plus the lemon juice and nutritional yeast to the blender. Blend until smooth, adding additional chicken broth if the mixture is too thick. Heat the butter and olive oil in the skillet over medium heat. Add the garlic and mushrooms. Cook until the mushrooms turn a dark brown, adding any remaining chicken broth. Cook the fettucine according to package directions. To serve, mix the fettucine with the alfredo sauce, then spoon some of the mushrooms on top. Garnish with fresh parsley or basil. 

Serves 3-4
Stealthy Cooking Tip: Use vegetable stock to make this a vegan recipe. Add some bacon or prosciutto to the mushrooms to make a meat lover happy. Use gluten free noodles to make this gluten free. Whichever option you prefer, enjoy!


Wednesday, February 7, 2024

Very Veggie Noodles

I first tasted a dish similar to this one at a delightful little cafe in Dubrovnik called Nishta. They called their dish Pastalicious. It was on their gluten free, vegan menu. As you can see, I added a few shrimp, just because it seemed like the right thing to do at the moment. Make it without the shrimp for a vegan version, or add them if you like. Either way, this dish is quite delicious!

Ingredients:

extra thin rice noodles, enough for two servings 

1 tsp olive oil
1 clove garlic,  minced 
1 tsp minced ginger
6 shrimp

1 tsp olive oil
4 oz mushrooms, brushed clean, stemmed, and sliced
1 rib celery, sliced
1 carrot, peeled and sliced
1/2 cup thinly sliced red pepper 
1/2 cup yellow beans
4 spears asparagus, cut into 1 inch pieces
1 stalk lemongrass, cut into 3 pieces
1-2 Tbs red curry paste 
5 oz coconut milk 

1/4 cup roasted cashews
1 green onion, thinly sliced

Directions:

Bring a large pot of water to a boil. Cook the rice noodles according to package directions. When, cooked, drain the noodles. 

Cook the shrimp and vegetables while the water is coming to a boil and the noodles cook. To cook the shrimp, heat the teaspoon of oil in a nonstick skillet. Add the garlic, ginger, and shrimp and cook until the shrimp just turn pink, 2 or 3 minutes. Remove the shrimp and aromatics from the skillet. Add the second teaspoon of oil to the skillet along with the vegetables. Cook until the mushrooms begin to change color, about 5 minutes. Add the lemongrass stalk, along with the curry paste and the coconut milk. Cook another minute, just until it begins to thicken. Add a little more coconut milk, if the sauce is too thick.  Add the shrimp to the vegetables, then add the drained pasta, and mix everything together. 

To serve, remove the lemongrass stalk, then divide the noodles with veggies and shrimp between two plates. Top with some of the roasted cashews and green onion. 

Serves 2

Stealthy Cooking Tip: I used Mai Fun style noodles, which are very thin rice noodles, to make this dish. They're gluten free! Because they are so thin, they give this dish a silky texture. Adding the crunchy cashews on top, mixes things up a bit, and the juxtaposition in textures makes this dish exciting to the palate. 

Wednesday, December 6, 2023

Stuffed Butternut Squash

It's fall here, and my delight with orange produce is at its highest. This savory squash dish is a perfect fall side or main dish. I enjoyed it as a main with a side of salad and applesauce. Mmmmm

Ingredients: 

1 medium butternut squash
1 link sausage, casing removed, or vegan sausage
1 tsp olive oil
1 stalk celery, thinly sliced
1 clove garlic, minced
1/2 cup chopped onion
1 cup chopped mushrooms
1 Anaheim chili, seeded, deveined, and chopped
1 Tbs chopped fresh sage or 1 tsp dried sage
1/4 cup cream cheese, or vegan cream cheese
1 Tbs chopped fresh parsley

Directions: 

Preheat oven to 425F. Cut butternut squash in half, lengthwise, then scoop out the seeds. Spray a cookie sheet with oil and place the squash cut side down on the sheet. Roast for about 15 minutes, then turn over and continue roasting until the squash is tender, about 30 more minutes. Prepare the stuffing while the squash roasts. Place a nonstick sauté pan over medium heat. Cook the sausage, breaking it into small pieces while it cooks. Remove the sausage from the pan, draining the remaining fat. Add the olive oil to the pan along with the celery, garlic, onion, mushrooms, and pepper. Cook until the vegetables are tender, about 5 minutes. Add the chopped fresh sage to the vegetable mixture. When the squash is tender, remove it from the oven. Scoop out some of the squash, leaving about a 1/2 inch thick layer of squash. Chop the squash, then add it to the vegetables. Divide the vegetables between the two squash halves. Top each half with some of the cream cheese. Roast an additional 10 minutes, until the top of the mixture begins to turn slightly brown. Sprinkle each half with the parsley, then serve. 

Serves 2 generously, or 4 as a side dish


Stealthy Cooking Tip: Adding sausage to anything makes it taste better ... especially to the meat lovers in the house. There are several plant based sausages available, if you want to make this a vegan dish!

Sunday, September 3, 2023

Vegetable Biryani

Biryani is a rice dish with mixed vegetables, spices, and sometimes meat. It is thought to have originated in either India or Persia, and is enjoyed throughout both areas. I enjoy it here in the US, as many do! I most frequently make this as a hearty side dish with plenty of vegetables, and that is the version you'll see here today. I use whatever veggies I have on hand - carrots, green beans, peas, onions, peppers. The one constant is rice. I almost always use basmati rice, but really any kind of rice will yield delicious results.  

Ingredients: 

1/2 cup basmati rice
1 cup low sodium chicken or vegetable stock
1 tsp minced ginger
1 tsp minced garlic (1 clove)
1/4 cup diced onion
1 carrot, peeled and thinly sliced
1 Anaheim chili, seeds removed, and diced
1/2 tsp garam masala
1 pinch saffron

1/2 cup green beans, ends removed and sliced crosswise into 1/2 inch pieces
1 tsp butter

2 Tbs chopped mint
2 Tbs chopped cilantro
1 Tbs chives, cut into 1/4 inch pieces

Directions: 

Place rice through saffron in a rice cooker or a small saucepan set over medium heat. If using the saucepan, bring to a boil, cover and reduce to a simmer. Cook until the rice is tender, about 20 to 25 minutes. If using the rice cooker, cook until done. Add the green beans and butter, then stir to combine. Replace the cover and let the rice steam for another 5 minutes. Serve, topping each serving with some of the mint, cilantro and chives. 

Serves 2 (generously)
Stealthy Cooking Tip: Biryani is usually made by cooking the vegetables first, then adding a layer of cooked rice, finished with a layer of spicy sauce. I've simplified this by simply putting everything in one pot. True, it's similar to a pilaf, but the end result is delicious, so I'm okay with that!

Sunday, August 20, 2023

Panang Curried Corn Chowder

There’s something about fusion cooking that I find exciting! I love combining the tastes of Thai Panang curry with all American corn chowder. Thai hot and sweetly spicy sauces combine with the comfort food taste of potatoes and corn, all in a chowder. How fun is that? I’ve made this recipe super quick and easy by taking the shortcut of using a premade curry sauce instead of making the sauce from scratch. I’ve found Panang curry sauces at a local Asian market, but also at specialty food stores like Sprouts or Whole Foods. 

Ingredients 

1 tsp olive oil
1/2 cup chopped sweet onion
1 clove garlic, minced
1/2 cup chopped red pepper
1/2 cup sliced mushrooms 
1 cup diced potatoes, Yukon gold or white potatoes 
1 cup corn
1 13 oz jar Panang curry sauce
1-1/2 cups chicken stock
1/4 tsp red pepper flakes
1/4 cup Thai basil, chopped with a few florets left whole for garnish

Directions 

Heat the olive oil in a soup pot set over medium heat. Add the onion, garlic, pepper, and mushrooms. Cook for several minutes until the onions are translucent and the mushrooms begin to brown. Add the curry sauce and chicken stock. Reduce the heat to low and simmer until the potatoes are tender. Ladle the soup into bowls, topping with a pinch of red pepper flakes and some of the Thai basil. Garnish each bowl with a Thai basil floret. Enjoy! 

Stealthy Cooking Tip: Fusion cooking is a fun way to introduce new flavors. It’s also a way to shake up your menu pattern, giving your tastebuds something new to explore. 

Sunday, July 16, 2023

Stuffed Portobellos on Creamed Millet

I had a dish similar to this when I was at a wonderful seaside restaurant - in Croatia. The food would have tasted wonderful wherever it was served, but from where I sat, it tasted just as spectacular as the view. Many dishes in the area are "creamed" or "creamy", but almost none of them use cream. Instead, the term refers to using a blender to make the dish smooth. In this case, I used both stock and coconut milk to help smooth the millet, turning it into a creamy porridge to set off the savory mushroom on top. The restaurant was called The Botanist, located in Zadar, and it's a vegan restaurant. I took some liberties with my interpretation, and used an egg and some chicken stock in this dish. I've added notes to make it vegan.  

Ingredients: 

1/2 cup millet
1 cup low sodium chicken or vegetable stock
1/2 cup water
1/2 cup light coconut milk

2 portobello mushrooms
1/2 cup breadcrumbs or gluten free breadcrumbs
2 Tbs minced onion
2 Tbs finely chopped red pepper
1 tsp minced garlic
1 tsp parsley
1 tsp oregano
1/2 tsp sea salt
several grinds of pepper
1 egg (or 1/4 cup stock)
1 Tbs Parmesan (can use vegan Parmesan)
1 pinch paprika
1 pinch pink sea salt

Directions: 

Preheat oven to 400F. Remove the stems and gills from the mushrooms. Combine the bread crumbs through the egg or stock in a large bowl. Use your hands to lightly mix them together. Divide the bread crumb filling between the mushrooms. Top each mushroom with the Parmesan. Place the mushrooms on a nonstick ovenproof pan and cook for 30 minutes. Make the creamed millet while the mushrooms are cooking. Combine the millet and the liquids in a saucepan. Bring to a boil over medium heat. Lower the heat to a simmer, cover and cook for 20 minutes. Use an immersion blender to make the mixture smooth. Taste the creamy millet, and add salt to taste. 

Divide the millet between two plates. Top each with one of the mushrooms. Sprinkle some of the Paprika and sea salt over each serving. 

Serves 2
Stealthy Cooking Tip: It gets a little easier to make dishes vegan all the time. Vegetable stock makes a good substitute for chicken stock. There are several brands of vegan Parmesan available as well. While the egg helps to hold the filling together, it isn't necessary. Vegetable stock will do the job just fine! I've included both methods. Aren't options fun!


Tuesday, February 28, 2023

Tamal Stuffed Mushrooms

I recently visited Tucson and had the good fortune to eat at El Charro restaurant. It's been in business for over 100 years, and there's some very delicious reasons why! I've had something different each time I've visited there, and everything has always been delicious. This time, I had an appetizer that was stuffed with a vegan tamale mixture, and it was soooo tasty that I had to make my best approximation of it when I got home. If you're ever in Tucson, make sure to eat at El Charro in Old Town - it's one of my all-time favorites!

Ingredients: 

20 baby portobella mushrooms or 4 large portobellas

1 cup masa harina
1/4 tsp baking powder
1/2 tsp salt
3 Tbs plus 1 tsp extra virgin olive oil
3/4 cup to 1 cup broth

1/4 cup cooked quinoa
2 Tbs chopped onion
1/4 cup chopped nopalitos, rinsed, drained, and patted dry (or Anaheim chilis)
1/4 cup corn, cut off the cob, or microwaved and drained if frozen, or drained if canned

1/2 cup green enchilada sauce
1/2 cup green salsa
1/4 cup nopalitos, rinsed, drained, and patted dry

1 cup fresh tomato salsa
1 cup fresh avocado salsa or guacamole

Directions: Heat the oven to 325F. Prepare the mushrooms by removing the stems. If you're using the larger portobello mushrooms, scrape out and discard the brown gills. The smaller mushrooms won't usually have ripened gills, so they won't need to be removed. Prepare the tamale filling by mixing the masa together with the baking powder and salt in a large bowl. Pour in 3 tablespoons of the olive oil, then use your hands to mix everything together. When squeezed, the mixture should slightly hold together. If it doesn't, add the additional teaspoon of olive oil and mix together by hand. Add 3/4 cup of chicken or vegetable broth and mix with a mixing spoon. If the mixture is very dry, add another 1/4 cup of stock. Fold in the quinoa, onion, nopalitos, and corn. Choose a baking dish that will hold the mushrooms in one layer. Mix the enchilada sauce, salsa, and nopalitos together, then pour enough of the sauce to cover the bottom of the baking dish about 1/4 inch deep. Generously fill each mushroom with some of the tamale filling then place in the baking dish. When the dish is full, cover tightly with either foil or a tight-fitting lid (I used both!) and bake for 45 minutes. Check to see if the filling is cooked and the salsa sauce is bubbling. Cook an additional 15 minutes if needed. Serve by spooning some of the green enchilada sauce mixture over the mushrooms, along with the tomato salsa and avocado on the side. 

Serves 4, more as an appetizer

Stealthy Cooking Tip: Nopalitos are available canned, with a surprising amount of spice to them! They'll add tons of flavor to your dish. If you can't find them, use canned or fresh Anaheim chilis. 

Monday, October 31, 2022

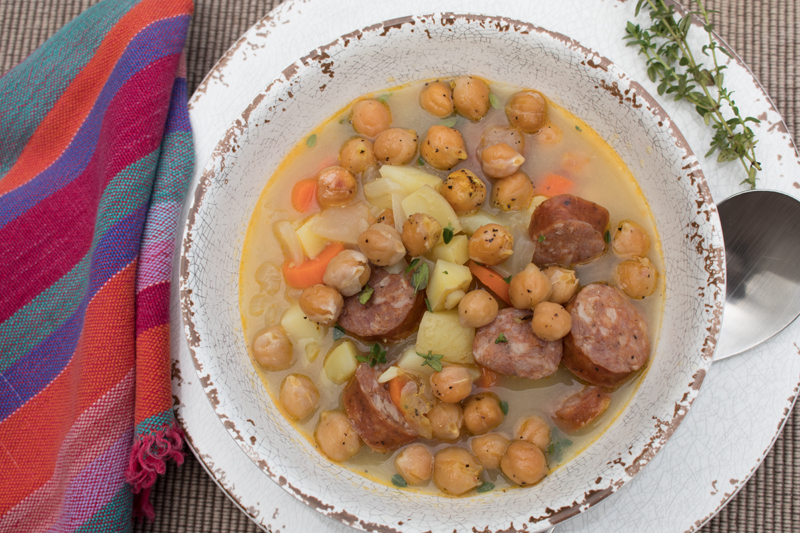
Potato Soup with Chickpeas

I really enjoy my Purple Carrot boxes - their recipes are innovative, fun, and delicious. This recipe uses some of their tricks: mixing miso with bullion as a soup base, then adding multiple layers on top of the finished dish for taste, texture, and visual appeal. Enjoy!

Ingredients: 

1 tsp olive oil
1/2 cup sweet onion, chopped
1 clove garlic, minced
1 link Andouille sausage, cut into 1/2 inch pieces
2 cups water or 1 cup water and 1 cup low sodium chicken broth
1 tsp chicken bullion, if not using chicken broth
1 tsp white or yellow miso
1 cup yukon gold potatoes, diced
1/2 cup carrots, peeled and cut into 1/2 inch lengths
salt and pepper to taste

1 can chickpeas, rinsed and drained
lemon zest
1/4 tsp pepper
1 tsp olive oil

1 tsp fresh thyme leaves, plus thyme sprigs for garnish
   or 1 tsp dried thyme

Directions: 

Preheat the oven to 425F.

Heat the olive oil in a large soup pot. Add the onion and garlic and cook for about 2 or 3 minutes, just until the onion begins to turn translucent. Add some water to the pot if the vegetables start to stick. Place the Andouille sausage into a microwave proof container and cook on high for 1 minute. Drain the sausage, discarding the fat, then add the sausage to the soup pot. Add the water, along with the bullion and miso. Then add the potatoes and carrots. Bring to a simmer and cook, about 15 minutes, until the potatoes and carrots are tender. Taste the soup, adding salt and pepper to taste. 

Toss the chickpeas with the lemon zest, pepper, and olive oil and place on a baking sheet. Roast for 15 minutes, until the chickpeas start to get crispy and slightly brown on the outside. 

Serve by ladling soup into bowls, then topping each bowl with a generous spoonful or two of chickpeas. Finish by garnishing with thyme leaves. 

Serves 3 or 4
Stealthy Cooking Tip: Meal kits have been all the rage for a while now. Of course, I had to jump on the bandwagon to see what all the fuss was about. The Purple Carrot meals are vegan and come with the ingredients already measured out and packaged together in one bag. I find they combine ingredients in ways that are frequently new to me, like crunchy chickpeas on top of smooth tasting soups. They've also introduced me to some ingredients that are just now becoming easy to find in the regular supermarket - think gochujang! Trying new foods, new combinations, or new meal kits, is another great way to expand our horizons and find new ways to enjoy healthy meals. 

Friday, September 30, 2022

Paella Salad


It's so hot here in Sacramento - it was 116F a couple of days ago. All I want to eat are cold salads - but salads that have some interest. Here's a salad based on the ingredients in Paella, but it's cold and delicious!

Ingredients:

1 chicken thigh, cut into 1 inch cubes
8 small scallops, shrimp, or mussels
1 link andouille sausage, thinly sliced
1 Tbs olive oil
1 shallot, chopped
1 clove garlic, minced
1 tsp dried oregano or 1 Tbs fresh oregano

for the salad:
1 cup mixed salad greens
1 cup arugula
1/2 cup thinly sliced sugar snap peas
1/2 cup thinly sliced celery or fennel
1/4 cup thinly sliced green onion

for the vinaigrette:
1/4 cup red wine or sherry vinegar
1 lemon, juice one half, cut the other half cut into wedges for garnish
2 Tbs. honey
1 tsp mustard (whole grain preferred)
1 tsp paprika
1/4 tsp oregano
1 pinch cayenne (optional)
1/4 cup extra virgin olive oil

Directions: Prepare the chicken, scallops, and sausage. Heat the olive oil in a nonstick skillet. Add the shallot and garlic and cook until the shallot begins to soften, about 2 minutes. Add the oregano, then the chicken. Remove the chicken when cooked, usually just a few minutes. Add the scallops to the pan and cook until just opaque, about 3 to 5 minutes. Remove the scallops and add to the chicken. Add the sausage to the pan and cook. Remove the cooked sausage from the pan, placing it on paper towels to drain, and allow to cool. Mix the salad greens with the vegetables in a large salad bowl. Make the vinaigrette by mixing the vinegar with the juice of 1/2 lemon, the honey mustard and the spices. Drizzle in the olive oil, mixing as it is added. Add the cooled chicken, seafood, and sausage to the salad, then toss with two tablespoons of the dressing. Add salt and pepper as desired. Serve, with lemon wedges on the side.

Serves 2 generously


Stealthy Cooking Tip: As you can see, I added some shishito peppers on the side - they just looked so festive with this Spanish inspired dish. If you need more substance with your salad, simply add 1/2 cup of Spanish Rice to each serving. You can find microwavable Spanish Rice by Seeds of Change that is ready in 90 seconds, so it won't heat up your kitchen too much!

Friday, September 9, 2022

Summer Bowl with Green Goddess Dressing

I love the story of Green Goddess Dressing - how the dressing was first made at the Palace Hotel in San Francisco as a tribute to the play "Green Goddess". It typically is made from a base of mayonnaise and sour cream, then gets its green tint from the green herbs which are blended into the dressing: chervil, chives, and tarragon. There's just a hint of saltiness from anchovy and a bit of a bite from lemon juice. I've changed things up, just a bit, and use this as a sauce over a bowl full of summertime vegetables with some brown rice. Just the thing for a warm end of summer night. 

Ingredients: 

1/2 cup brown rice
1 cup water
pinch of salt
1 cup broccoli, cut into small florets
1 cup kale, thinly sliced
1/2 cucumber, thinly sliced
10 grape tomatoes
1/2 avocado, sliced

for the dressing: 

1/4 cup ranch dressing (I used Follow Your Heart High Omega Vegan Dressing)
1 tsp finely chopped fresh parsley (1/2 tsp dried)
1 tsp finely chopped fresh chervil (1/2 tsp dried)
1 tsp finely chopped fresh tarragon (1/2 tsp dried)
1 tsp finely chopped chives (optional)
1 Tbs lemon juice

toppings:

2 Tbs pistachios
2 green onions, white parts thinly sliced, green parts cut into 1/2 inch lengths

Directions: 

Add the rice, water, and salt to a small saucepan, bring to a boil, cover and cook until tender, about 30-40 minutes. Or, cook the rice in a rice maker. Add several cups of water to a small saucepan and bring to a boil. Add the broccoli, and cook until al dente, about 3 or 4 minutes. Drain the broccoli and run under cool water to stop the cooking process, then set aside. Make the dressing by mixing the ranch dressing with the herbs. You may use a blender to get a pretty green color, or just mix them together for a more rustic looking, speckled dressing. Make two bowls by scooping some of the rice onto each bowl. Then divide the green beans, snap peas, cucumber, tomatoes, and avocado between the bowls. Drizzle some of the dressing on top of each bowl, topping with pistachios and green onions. 

Serves 2


Stealthy Cooking Tip: Imagine my surprise when I added the photo and found that I had used broccoli and kale when my own original recipe called for green beans and sugar snap peas! I always say to use whatever vegetables you have on hand!  


Tuesday, July 5, 2022

Teriyaki Rice with Tofu

I just call this teriyaki rice, forgetting to mention the tofu, when I serve this to my non-tofu loving family members. After the first bite, there are no questions asked about the ingredients, as everyone is too busy enjoying!

Ingredients: 

1-2 cups cooked short grain brown rice
1 cup extra firm tofu, cut into 1/2 inch cubes

1/4 cup water
1 tsp cornstarch
2 Tbs soy sauce
2 Tbs rice vinegar

2 tsp olive oil, divided
1 shallot, cut into small dice
1 clove garlic, minced
1 tsp minced ginger
1/2 cup mushrooms, sliced
1/2 red pepper, deveined and diced
2 carrots, peeled, quartered and cut into 1 inch lengths
1/2 cup peas, fresh or frozen
2 green onions, sliced

1 tsp sesame oil
1/2 tsp black sesame seeds
1/2 tsp white sesame seeds

Directions: 

Mix the water together with the cornstarch and set aside. Combine the soy sauce and vinegar together in a small bowl. Add the tofu cubes to the soy sauce and vinegar mixture. Let the tofu marinate while you prepare the remaining vegetables. Heat just 1 teaspoon of the olive oil in a skillet over medium heat. Drain the tofu, saving the remaining sauce, then add the tofu to the skillet. Cook, turning occasionally until browned on all sides. Remove the tofu from the skillet, setting it aside. Add the second teaspoon of olive oil to the skillet. Add the shallot, garlic, and ginger, stirring until fragrant, about 1 minute. Add the remaining vegetables, along with any remaining soy mixture, and cook until the red peppers soften and the mushrooms begin to give off their liquid, about 3 or 4 more minutes. Return the tofu to the skillet, along with the cornstarch mixture and the sesame oil. Stir over the heat, until everything is hot and the sauce thickens. Divide the rice onto 2 plates, topping each with one half of the tofu mixture. Sprinkle some of the sesame seeds on top and serve. 
Serves 2

Stealthy Cooking Tip: The smaller tofu is cut, the easier it is to mix with the other vegetables. If you enjoy tofu, as I do, cut it into larger pieces, like I did in the photos. If you or others don't enjoy seeing tofu, then cut it smaller and it will simply "disappear" into the other vegetables. Tofu itself doesn't have much of a taste, but it does pick up tastes, so does well with a quick marinade. Enjoy!